
How to Prevent AI Hallucinations with Step by Step Rule
Learn how a 3-step process (Explore → Plan → Execute) prevents AI coding errors and ensures better results with Vooster AI's Step by Step rule.
Why You Shouldn't Let AI Jump Straight to Coding
Have you ever used AI coding tools? When you ask Cursor or Claude Code to "build this feature," AI immediately starts writing code. But often, when you check the results, they're completely different from what you intended.
Why does this happen? AI tends to implement without context. It doesn't properly understand your codebase conventions, and it's hard to notice when things go off track. It's like driving to a destination without a map.
In this article, we'll introduce the Step by Step Rule that forces AI to work systematically. By following just three steps—Explore → Plan → Execute—you can prevent AI "hallucinations" and achieve much better results.
The Step by Step 3-Step Process
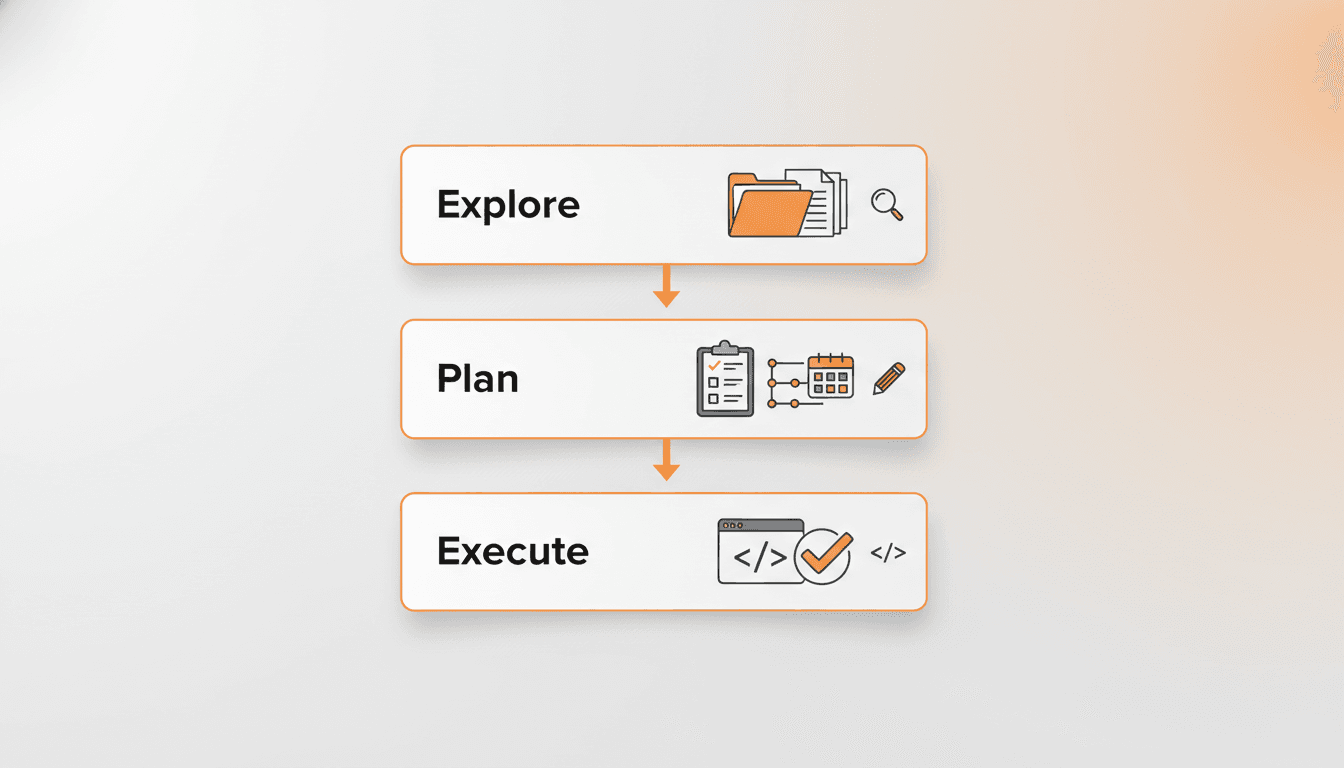
The core of the Step by Step Rule is forcing AI to go through a 3-step process instead of jumping straight to writing code.
Step 1: Explore and Analyze
First, ensure AI fully understands your project.
- Codebase Exploration: Identify relevant files and directory structure
- Analysis: Understand existing code patterns and architecture
- Convention Recognition: Check naming rules, file creation conventions, etc.
For example, if you request "create a user profile feature," AI first examines existing user-related code, database schema, API routing patterns, etc.
Step 2: Planning
Don't develop immediately—create a work plan. This is the most important step.
- Task List Creation: Break down implementation items step by step
- Acceptance Criteria Definition: Clearly define completion criteria for each task
- Dependency Identification: Determine which tasks must be completed first
With a planning phase, you can check if things are going in the wrong direction. For example:
Task List Example:
- Add profileImage and bio fields to User model
- Create profile view API endpoint (
GET /api/profile/:userId) - Create profile update API endpoint (
PUT /api/profile) - Write profile page UI components
- Implement image upload functionality
Acceptance Criteria Example:
- Profile images must be 5MB or less
- Bio limited to 500 characters maximum
- Only logged-in users can edit their own profile
- Changes reflected immediately in UI after update
Step 3: Execute Implementation
Progress through the list created in the planning phase, checking items one by one.
AI implements each task item in order and verifies whether Acceptance Criteria are satisfied. During this process, if things deviate from the intended direction, you can immediately notice by referring to the planning list.
Why the Planning Phase Matters

Many developers want to skip the planning phase. "Why do I need to plan when I can just write code quickly?"
But the planning phase is the most powerful safety net in AI coding.
1. Mid-Process Validation is Possible
With a task list, it's clear which step AI is currently working on. If it suddenly tries to restructure the entire database while working on task 3, you can immediately notice: "Wait, this wasn't in the plan."
2. "Complete" Has a Clear Definition
With Acceptance Criteria, you can give a clear answer to the vague question "Is this feature done?" If all Acceptance Criteria are satisfied, it's complete. If even one is missing, it's incomplete.
3. Prevents Unintended Results Proactively
Reviewing the task list during planning lets you discover "Hey, this isn't what I wanted" before actual implementation. This is much more efficient than rebuilding after all the code is written.
4. Easy to Share in Team Collaboration
If working in a team, you can share AI's planning with teammates for feedback. All team members share the same goals and completion criteria.
Additional Tips for Writing Cursor Rules
When applying the Step by Step Rule to Cursor or Claude Code, here are some tips.
1. Use File References
Explicitly specifying "refer to this file" in rules makes AI follow conventions more accurately.
Example:
Before implementing, check:
- File naming: See `src/components/user/UserCard.tsx`
- API patterns: See `src/app/api/users/route.ts`
- Type definitions: See `src/types/user.ts`
2. Include Code Examples
Adding example code in rules saying "write in this style" helps AI maintain consistent coding style.
3. Write in English
Many developers write rules in their native language, but we strongly recommend writing in English. Here's why:
- Fewer tokens: English is more token-efficient than many other languages
- Richer prompt expressiveness: AI models have much more English training data, so they respond more accurately to English prompts
- Shareable with global community: English rules are easily shared with other developers
4. Specify Stop Points at Each Step
## Step 1: Explore
- Explore the codebase
- **STOP HERE and confirm with me before proceeding to Step 2**

## Step 2: Plan
- Create task list
- Define acceptance criteria
- **STOP HERE and get my approval before Step 3**

## Step 3: Execute
- Implement one task at a time
- Check each acceptance criteria
This makes AI stop at each step for confirmation.
Using Step by Step Rule in Vooster AI
Good news! Vooster AI provides the Step by Step Rule by default.
Rules System
Vooster AI's Rules system provides these default rules:
- Step by Step: 3-step analysis and implementation process
- Clean Code: Code quality guidelines
- Git Commit Message: Conventional Commit format
- TDD: Test-driven development
- ISMS-P: Information security standards
When creating a project and selecting a template, a Step by Step Rule optimized for that template is automatically included. Each template—EasyNext, SuperNext, FullSaaS—comes with rules tailored to its framework and architecture.
Apply Immediately via MCP Integration
Vooster AI directly integrates with Cursor and Claude Code through MCP (Model Context Protocol). Just add one line to your config file:
{
  "mcpServers": {
    "vooster-ai": {
      "command": "npx",
      "args": ["-y", "--package=@vooster/mcp@latest", "vooster-ai", "--api-key=YOUR_KEY"],
      "type": "stdio"
    }
  }
}
Now you can use Vooster AI's Step by Step Rule directly in your coding tool. AI automatically follows the Explore → Plan → Execute sequence.
Conclusion
When assigning work to AI, simply following the "Explore → Plan → Execute" sequence completely changes the results.
- Explore ensures AI properly understands your project
- Plan prevents unintended results proactively
- Execute maintains consistency by following checklists
The Step by Step Rule is simple yet powerful. It's the most reliable way to prevent AI "hallucinations."
Vooster AI provides this Step by Step Rule by default and supports MCP integration for immediate application to your projects. If you want a systematic AI development process, apply Vooster AI's Step by Step Rule today.
Start your systematic vibe coding journey with Vooster AI today!
Start Structured Vibe Coding with Vooster
From PRD generation to technical design and task creation - AI helps you every step. Start free today.
PRD Generation
Auto-generate detailed requirements
Technical Design
Implementation plan & architecture
Task Generation
Auto-break down & manage dev tasks
No credit card required · Full access to all features
Related Posts

Vooster MCP Setup + Getting Started with Development
How to connect Vooster MCP to Claude Code and Cursor in 5 minutes. Step-by-step guide from @vooster/mcp package setup to API key configuration and implementing your first task.

Why You Should Keep Updating Cursor Rules
Learn why continuously updating Cursor rules is essential for maintaining AI code quality and preventing bugs in evolving projects.

How to Prevent AI from Over-Engineering Your MVP
Learn how to prevent AI from adding unnecessary features like caching, audit logs, and performance optimizations to your MVP projects.